systemd unit hardening

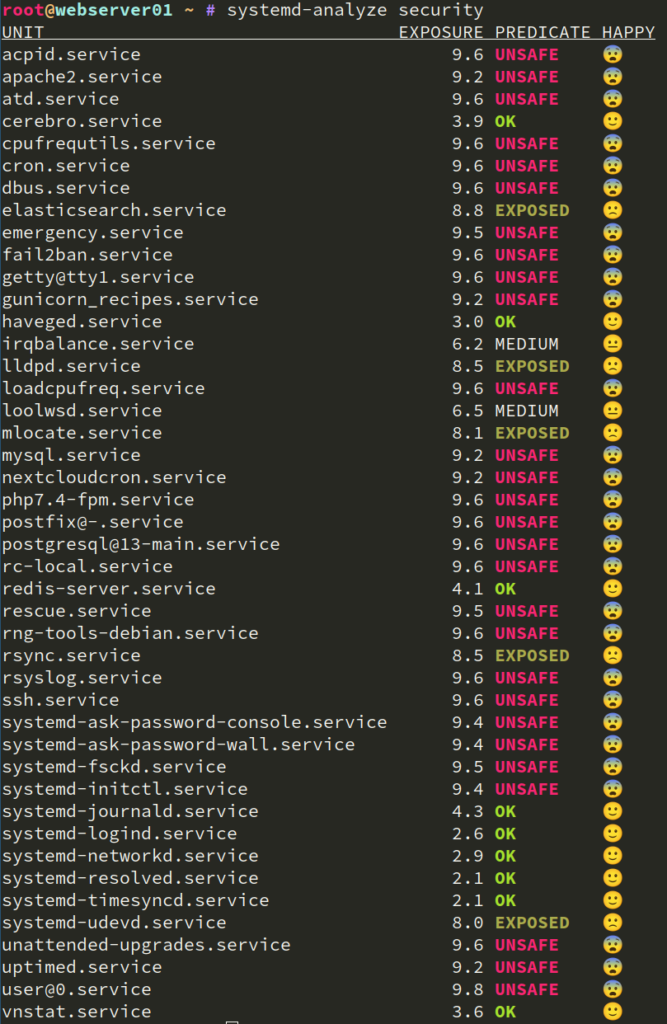
Systemd provides many hardening options for units. systemd-analyze security provides a nice overview for all services and their exposure level:

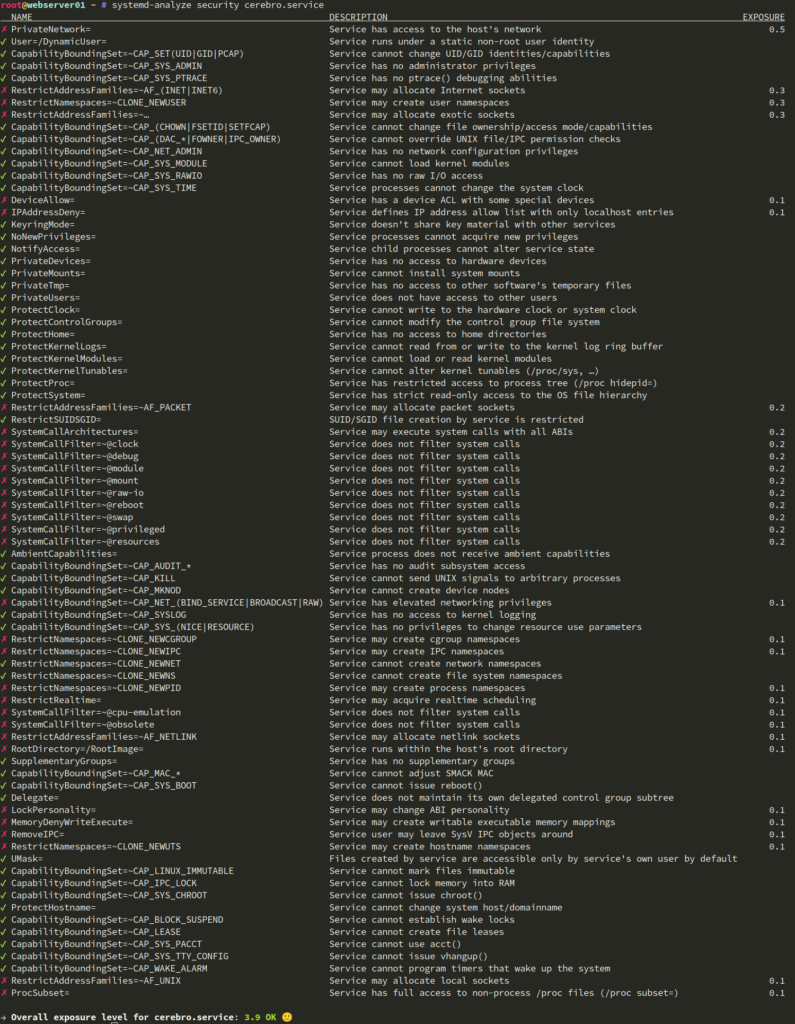
What do those levels mean and how can we improve it? Let’s take a closer look (Screenshot of my already tuned unit):

This detail view provides information about all hardening options supported *by your used systemd version*. https://www.freedesktop.org/software/systemd/man/systemd.exec.html and https://www.freedesktop.org/software/systemd/man/systemd.resource-control.html are good entrypoints for the systemd documentation. But keep in mind that the website documents the current systemd version. If you are on legacy operating systems like Debian or CentOS, the website probably lists options that your systemd doesn’t yet support.

Hardening a service

Cerebro is a java service. It provides a webinterface to manage elasticsearch clusters. If configured properly, it doesn’t need to write anything and only logs to stdout. That provides us plenty of hardening options. I ended up with the following unit:

[Unit]
Description=Cerebro, an ElasticSearch web admin tool
Wants=elasticsearch.service

[Service]
SuccessExitStatus=143
Environment="JAVA_HOME=/usr/lib/jvm/java-11-openjdk-amd64/"
WorkingDirectory=/opt/cerebro/cerebro-0.9.4
ExecStart=/usr/local/bin/cerebro -Dhttp.address=127.0.0.1
PrivateTmp=true
NoNewPrivileges=true
ProtectSystem=strict
ProtectHome=true
ProtectKernelTunables=true
ProtectKernelModules=true
ProtectKernelLogs=true
ProtectControlGroups=true
PrivateDevices=true
RestrictNamespaces=uts ipc pid user cgroup
CapabilityBoundingSet=CAP_NET_BIND_SERVICE
ProtectClock=true
RestrictSUIDSGID=true
PrivateUsers=true
ProtectHostname=true
ProtectProc=invisible
# only works because service is accessed an ssh tunnel
IPAddressDeny=any
IPAddressAllow=localhost
User=cerebro
Group=cerebro
UMask=077

[Install]
WantedBy=multi-user.target

What does it all do? Basically:

  • Do only allow access from localhost (because the service is accessed via an ssh tunnel / a reverse proxy)
  • Run with a dedicated user, that has no write access (except for a private /tmp directory)
  • Only provide a minimal set of special filesystems (/dev, /proc, /sys), in readonly

The different hardening options lowered the initial exposure level from 9.6 to 3.9

Posted in General, Linux | 1 Comment

Puppet control repo layout for puppet apply and agent/server Setup

The control repository in a Puppet context is usually a git repository that contains your Puppetfile. The Puppetfile has links to all modules in your environment and their version that shall be deployed. Besides the Puppetfile, Hiera data is often in that repository as well.

Very often people beginn with Puppet by using `puppet apply`. This means they have a bit of Puppet code in a local file and directly apply it. There is no agent running, there is no remote Puppetserver that compiles the catalog. This is easy for beginners but over time tricky to maintain. And eventually most people switch to puppet agent/server setup. By using a simple control repository layout from the beginning, it’s easy to work with puppet apply and an agent/server setup with the same codebase:

.
├── bin
│   └── config_script.sh
├── data
│   └── nodes
│       ├── basteles-bastelknecht.bastelfreak.org.yaml
│       ├── dns02.bastelfreak.org.yaml
│       └── server.fritz.box.yaml
├── environment.conf
├── hiera.yaml
├── LICENSE
├── manifests
│   └── site.pp
├── Puppetfile
├── README.md
└── site
    └── profiles
        ├── files
        │   └── configs
        │       └── facter.conf
        ├── Gemfile
        ├── Gemfile.lock
        ├── manifests
        │   ├── archlinux.pp
        │   ├── base.pp
        │   ├── centos.pp
        │   ├── choria.pp
        │   ├── dbbackup.pp
        │   ├── debian.pp
        │   └── sysctl.pp
        ├── metadata.json
        ├── Rakefile
        └── templates
            └── configs
                ├── bird.conf.epp
                └── ibgp.epp

This is a trimmed down version of my control repository. I will explain the important pieces and how to use it:

bin/config_script.sh

While applying code or compiling a catalog, puppet can execute a script and use the output to version the catalog/code. My script looks like this:

#!/bin/bash
CODEDIR='/etc/puppetlabs/code'   # better: $(puppet master --configprint codedir)
CODESTAGEDIR='/etc/puppetlabs/code-staging'  # better: "($puppet master --configprint codedir)-staging"
if [ -x /usr/bin/git ]; then
  if [ -d $CODESTAGEDIR ]; then
    ENVGITDIR="${CODESTAGEDIR}/environments/$1/.git"
  else
    ENVGITDIR="${CODEDIR}/environments/$1/.git"
  fi
  /usr/bin/git --git-dir $ENVGITDIR log --pretty=format:"%h - %an, %ad : %s" -1
else
  echo "no git - environment $1"
fi
exit 0

The script isn’t required, but it’s helpful to debug your code because it provides information about the version of the code that gets applied.

manifests/site.pp

# include OS specific profiles
case $facts['os']['name'] {
  'Archlinux': { contain profiles::archlinux }
  'CentOS': { contain profiles::centos }
  'Debian': { contain profiles::debian }
  default: {}
}

# include base profile that every node gets
contain profiles::base

## pluginsync
file { $::settings::libdir:
  ensure  => directory,
  source  => 'puppet:///plugins',
  recurse => true,
  purge   => true,
  backup  => false,
  noop    => false
}

# include node specific profiles
lookup('classes', Array[String[1]], 'unique', []).each |$c| {
  contain $c
}

Here happens the magic! In a small environment, where people might use puppet apply (like I do for my personal systems), you might have a few operatingsystems. That’s why I have a case statement to load profiles based on the operating system. I also have a base class that every system must have, so I contain that without any conditions. Many Puppet modules ship custom types/providers. They usually don’t work with puppet apply. With the file resource all plugins (types and providers, custom facts…) are copied into the correct directory. This is what happends during a pluginsync during an agent run. At the end I include all classes that are defined in Hiera.

hiera.yaml

---
version: 5
defaults:                                       # Used for any hierarchy level that omits these keys.
  datadir: data                                 # This path is relative to hiera.yaml's directory.
  data_hash: yaml_data                          # Use the built-in YAML backend.

# we can't use $trusted because those facts are only available when a puppetserver compiles a catalog
# don't use trusted.fqdn because legacy facts aren't enabled
hierarchy:
  - name: "Per-node data"                       # Human-readable name.
    path: "nodes/%{facts.networking.fqdn}.yaml" # File path, relative to datadir.
  - name: common
    path: common.yaml

The Hiera hierarchy is quite simple. We have one data/common.yaml for defaults and node specific stuff in data/nodes/. This is the recommended minimal setup. You can introduce more hierarchies depending on your infrastructure. Common values are:

  • Location (Country, Datacenter)
  • Operating System (Family/Name/Major version)
  • App environment (staging, development, production)

data/nodes/dns02.bastelfreak.org.yaml

---
classes:
  - profiles::choria

profiles::base::borg_keep_monthly: 6
profiles::base::borg_keep_weekly: 12
profiles::base::borg_keep_daily: 14
profiles::base::borg_keep_within: 7
profiles::base::manage_ferm: false
profiles::base::dns_resolvers:
  - 127.0.0.1
profiles::archlinux::locales:
  - en_US.UTF-8 UTF-8
  - en_GB.UTF-8 UTF-8

This is an example for assigning additional profiles. The YAML file contains an array, named classes. the code in the site.pp will look that up and contain every profile listed here

environment.conf

config_version = 'bin/config_script.sh $environment'
modulepath = site:modules:$basemodulepath

This short snippet is quite important as it manipulates the default modulepath. It allows us keep our own puppet code (custom modules, profiles) in the same git repository. Each module is a directory below site/. Alos the config_script.sh is configured here.

Actually use this

So how do we use this? I recommend:

puppet apply /etc/puppetlabs/code/environments/production/manifests/site.pp --show_diff --environment production --write-catalog-summary --summarize --strict_variables --strict error --graph

There are a lot of parameters. This basically tells Puppet to apply the site.pp. This will trigger a hiera lookup and also apply the additional profiles. The remaining parameters, except for –environment, are not required, but helpful.

  • –graph render .dot files for all resources and their dependencies to /opt/puppetlabs/puppet/cache/state/graphs/
  • –strict / –strict_variables. Handle uninitialized variables as compile error. This is helpful to ensure a clean codebase
  • –show_diff when files are updated, print a diff
  • –write-catalog-summary create /opt/puppetlabs/puppet/cache/state/*yaml with information about the apply runtime and their resources
  • –summarize print some statistics (also contains the output from config_script.sh at the bottom):
root@dns02 ~ # puppet apply /etc/puppetlabs/code/environments/production/manifests/site.pp --show_diff --environment production --write-catalog-summary --summarize --strict_variables --strict error --graph --noop
Notice: Compiled catalog for dns02.bastelfreak.de in environment production in 0.93 seconds
Notice: Applied catalog in 3.67 seconds
Application:
   Initial environment: production
   Converged environment: production
         Run mode: user
Changes:
Events:
Resources:
            Total: 743
Time:
   Concat fragment: 0.00
      Concat file: 0.00
         Schedule: 0.00
             User: 0.00
            Mount: 0.00
   Ssh authorized key: 0.00
             Exec: 0.00
             Cron: 0.00
              Pam: 0.00
      Ini setting: 0.01
         Shellvar: 0.06
           Sysctl: 0.09
          Package: 0.19
             File: 0.19
          Service: 0.28
   Config retrieval: 1.19
          Vcsrepo: 1.52
         Last run: 1641152972
   Transaction evaluation: 3.60
   Catalog application: 3.67
       Filebucket: 0.00
            Total: 3.70
Version:
           Config: 40cc184 - Tim Meusel, Mon Dec 20 15:43:45 2021 +0100 : Merge pull request #68 from bastelfreak/server
           Puppet: 7.13.1
root@dns02 ~ #

Conclusion

I really like this code setup because it’s easy to use and hopefully not too opinionated. I’ve used this in a few environments and it works like a charm for puppet apply setups but also for agent/server environments.
Posted in General, Linux, Puppet | Tagged , | Leave a comment

Setup a Raid 10 with mdadm

In the past I already blogged a few times about mdadm. Today we’ve a short article about creating a Raid 10 with mdadm on new disks.

# lsblk 
NAME           MAJ:MIN RM  SIZE RO TYPE  MOUNTPOINTS
sda              8:0    0 16.4T  0 disk  
sdb              8:16   0 16.4T  0 disk  
sdc              8:32   0  2.7T  0 disk  
├─sdc1           8:33   0    1M  0 part  
└─sdc2           8:34   0  2.7T  0 part  
  └─md1          9:1    0  2.7T  0 raid1 
sdd              8:48   0  2.7T  0 disk  
├─sdd1           8:49   0    1M  0 part  
└─sdd2           8:50   0  2.7T  0 part  
  └─md1          9:1    0  2.7T  0 raid1 
nvme0n1        259:0    0  1.8T  0 disk  
├─nvme0n1p1    259:1    0  953M  0 part  /boot
└─nvme0n1p2    259:2    0  1.8T  0 part  
  └─cryptroot  254:0    0  1.8T  0 crypt 
    └─vg1-root 254:1    0  750G  0 lvm   /

First we need to identify the two disks. lsblk is always a good indicator about all block devices. In this case I know that the new drives are sda and sdb because of their size and the absence of partitions. Since those drives are new, we should start a smart test first:

for disk in /dev/sd[a,b]; do smartctl --test long "${disk}"; done

We now need to wait a few hours. The status of the self test can be checked with:

for disk in /dev/sd[a,b]; do smartctl --all "${disk}"; done

Afterwards we can create the raid. Keep the bathtub curve in mind. Hard drives, while used correctly, fail within their first hundred hours our after their estimated lifetime. The best system would be a setup with used drives, from older systems. And you always replace failed disks with new drives. This isn’t really viable for private workstations. I suggest to fill the drives with dd a few times or keep them idle for a few days. If the still work afterwards, they are usually good to go. If you feel confident to use the disks we can continue.

If you have a system with legacy boot (no UEFI) you often have a bios/grub boot partition. This partition starts at sector 2048 and ends at 4095 (and needs a special flag). It turns out to be good practice to have this partition on all disks so you are able to install a bootloader on all disks, if ever required. Since that’s really not a lot of lost space for our raid, we should create this partition on the raid disks as well. We will create a second partition with the remaining space. That will be used within the raid setup:

for disk in /dev/sd[a,b]; do
  parted "${disk}" --script mklabel gpt
  parted "${disk}" --script mkpart primary ext3 2048s 4095s
  parted "${disk}" --script set 1 bios_grub on
  parted "${disk}" --script mkpart primary ext3 4096s 100%
 done
mdadm --verbose --create /dev/md/0 --level=1 --raid-devices=2 --metadata=1.2 /dev/sd[a,b]2

parted needs a parameter for the filesystem. It won’t create it. So don’t get confused with the ext3. There won’t be any ext3. Now we need to wait until the raid is initialized and afterwards continue:

# configure max raid sync
echo 999999999 > /proc/sys/dev/raid/speed_limit_min
echo 999999999 > /proc/sys/dev/raid/speed_limit_max
until ! grep -q resync /proc/mdstat; do echo "sleeping for 2s"; sleep 2; done

mdadm will read through the whole partitions and sync them. If you’ve full trust in the disks you could initialize the raid with –assume-clean and have no initial sync. Now we create a luks container and on top LVM:

cryptsetup luksFormat -c aes-xts-plain64 -s 512 --hash sha512 --use-random -i 10000 /dev/md/0
cryptsetup luksOpen /dev/md/0 raid
pvcreate --verbose /dev/mapper/raid
vgcreate --verbose vg1 /dev/mapper/raid
lvcreate --verbose --name root --size 50G vg0
mkfs.ext4 -v  -E lazy_itable_init=0,lazy_journal_init=0 -m0 /dev/mapper/vg0-root
mount /dev/mapper/vg0-root /mnt

ext4, since kernel 2.7.37, uses lazy initialization for the inode table. That means that the mkfs process is quite fast, but after the first mount the inode table will be initialized. That takes some time and slows down any other write commands. the -v option provides us some nice output and -m tells mkfs to have zero reserved blocks. The default is 5% and that’s quite a lot for 18TB disks.

Additional information

We could parse the hdd temp from smartctl, but that’s a bit ugly. We can simply use hddtemp. Arch Linux has that tool packaged.

hddtemp /dev/sd?

And of course we can continuously watch it:

watch hddtemp /dev/sd?

We can also check the Raid status with:

cat /prod/mdstat

And that works also well with watch:

watch cat /proc/mdstat
Posted in General, Linux | Tagged , , | Leave a comment

Automate let’s encrypt with systemd timer

A long long time ago I wrote a blog post about let’s encrypt automation with systemd timers that triggers letsencrypt: https://blog.bastelfreak.de/2016/05/lets-encrypt-automation-the-awesome-way/

Much changed this 2016. letsencrypt CLI is now called certbot, it can do auto renew via it’s own service and much more. I adjusted my setup slightly. I still have my own services:

# /etc/systemd/system/letsencrypt-renew@.timer
[Unit]
Description=run cert renew for %I every two month

[Timer]
# every two months?
OnCalendar=*-1/2-1 4:0:0
Persistent=true

[Install]
WantedBy=multi-user.target

# /etc/systemd/system/letsencrypt-renew@.service
[Unit]
Description=renew certificates for %I

[Service]
Type=oneshot
ExecStartPre=/bin/mkdir -p /var/lib/letsencrypt/.well-known
ExecStart=/usr/bin/certbot certonly \
  --webroot \
  --webroot-path=/var/lib/letsencrypt/ \
  --renew-by-default \
  --keep \
  --agree-tos \
  --email tim@bastelfreak.de \
  --rsa-key-size 4096 \
  --non-interactive \
  --text \
  -d %I
ExecStartPost=/bin/systemctl reload-or-restart apache2

[Install]
WantedBy=multi-user.target

This pretty much looks like my old setup. Back in the days, every vhost in my webserver configuration had an entry to redirect let’s encrypt requests to another directory, outside of the docroot. Now I use a dedicated vhost for this:

<VirtualHost *:80 [2a01:4f8:171:1152::c]:80>
	DocumentRoot /home/something.bastelfreak.de/htdocs
	ServerName something.bastelfreak.de
  ServerAdmin admin@bastelfreak.de
	<Directory /home/something.bastelfreak.de/htdocs>
		Options -Indexes +SymLinksifOwnerMatch
		Require all granted
    AllowOverride All
	</Directory>
	ErrorLog /home/something.bastelfreak.de/logs/error.apache.log
  LogLevel info
  CustomLog /home/something.bastelfreak.de/logs/access.log combined
</VirtualHost>

this allows me to easily block requests to the vhost that are not coming from let’s encrypt servers! To enable this for a new domain, I simply need to do:

systemctl enable letsencrypt-renew@newdomain.tld.timer
Posted in General, Linux | Leave a comment

Vox Pupuli Tasks – The solution to manage your git modules!

Who is not aware of the following problem. It’s Sunday afternoon, you’re bored. You want to do something useful, you want to contribute to the community – you want to review a pull request!

This might be a more or less known scenario to you. How would somebody start this, how do you identify a suitable pull request that you can review. I spend most of my time working on the Puppet community Vox Pupuli. Vox Pupuli has currently 518 open pull requests. Not all of them are in a state where you can or should review code. A few examples:

  • The PR is already reviewed and the author needs to add tests, but the code is fine
  • The PR is already reviewed and the author needs to document their new feature, the code is fine
  • The PR is already reviewed and the author needs to update the code
  • The PR is already reviewed and the author needs to update the code because it breaks existing tests
  • The author needs to update the code because it breaks existing tests
  • The PR has merge conflicts that must be resolved

It’s possible that you spend an hour just checking existing PRs and you notice that all of them already are reviewed and/or waiting for the author to work on it. This is frustrating and kills the rare time open source collaborators have. Nothing of the above is Puppet- or Vox Pupuli specific. This happens in every bigger community or company. Besides that, there are also some Puppet specific tasks that maintainers need to do on a regular basis (yak shaving):

  • Drop EOL puppet versions from metadata.json
  • Add new Puppet versions to metadata.json
  • Drop EOL linux versions + their tests + their code
  • Implement new linux versions
  • Ensure dependencies are up2date and resolve cleanly

This list is far away from being complete, but it provides a good overview of all the regular tasks. They all consume time that could be spend on reviewing new codes.

My friend Robert Müller and I identified those painpoints because we suffer them every day. Together we want to automate as much as possible of those jobs so the Vox Pupuli collaborators can be more productive and efficient – we started Vox Pupuli Tasks.

All the Vox Pupuli modules are stored at GitHub. And GitHub has this nice concept of Git Hub Apps. Those are webservices that get notifications for every action that happens in a specific GitHub namespace. Also the Apps can respond to it. We (mostly Robert, because he’s awesome) created a Ruby on Rails application that receives GitHub events. Based on that we currently solve two and a half use cases:

Broken test suite

GitHub does not notify anybody if a check fails, also Travis-CI does not notify the pull request author. Many people are capable and interested in fixing their PR, they just don’t know it’s broken. So normally a collaborator checks a PR, sees it has a failed CI job and writes a comment so the PR author gets notified. The community has a guideline to add the tests-fail label to it. That’s partly helpful. Based on that we can filter PRs out in the GitHub search UI. But! the labels don’t disappear after the CI is working again so this approach is pretty much useless. Our Rais App gets notified about all pull requests and changes related to that PR.

  • If a PR has a successful CI run, we check if the label tests-fail is attached. If so, we remove it.
  • If the PR has a running CI job, we schedule a job that checks the CI status in a minute
  • If Ci failed, we attach the tests-fail comment. This makes it easy to filter the PR. But it does not notify the PR author about it. Therefore we also write a comment once into the PR

Merge conflicts

Pretty much as above. PR authors do not get notified if their pull request has a merge conflict. We normally attach the has-conflicts label, but that’s pointless if they don’t get removed automatically. Our Rails application again adds or removes a label and adds a comment. If one pull request gets merged we also trigger a job for all open pull requests in the same module. A merge can trigger conflicts in them.

Yak Shaving

Every puppet module provides parsable information. We’ve got the metadata.json that lists supported OS and Puppet versions. Our .msync.yml tracks the version of modulesync_config that got applied last. travis.yml lists the complete test suite, with two acceptance test jobs for each supported mainstream OS. We can automatically parse the data and at least create statistics about it and inform people when they need to act. In the past we had a very ugly Ruby script for this, which I wrote some time ago. Now with the Rails application, we can act upon changes in the code. We already render some nice statistics so people know when and where to act, but it’s not yet as much automated as it could be. But all checks are currently organized in a plugin system and can be enabled/disabled. This doesn’t hardcode the application into the Puppet ecosystem and keeps it flexible

VPT Status Quo

So what’s the current status of VPT (Vox Pupuli Tasks)? The above features are currently live for all Vox Pupuli puppet modules (not all Vox Pupuli git repositories). This already helps alot while reviewing pull requests. We’ve a customized GitHub search query that filters all PR’s out where a collaborators is waiting for the PR author. This reduces the number of 518 open PRs down to 175!

What’s next?

We want that people use this application. This requires two things:

  • Working documentation about the featureset and installation
  • Application needs to be portable and not tied to Vox Pupuli

Robert and I are currently working on both parts. New users also means new collaborators, and we’re always happy if people jump in and develop with us together. Our goal is to provide a generic Rails application that can act on events from version control systems. We’re currently working together with two companies that might use this. We want to make the application modular so everybody can use this, no matter if you maintain Puppet modules on github.com or python projects on your internal GitLab or Salt modules on yout GitHub enteprise instance.

Roadmap??

We currently don’t have a fixed roadmap, but we want to! There are already a bunch of open issues with features and enhancements that we want to implement. We’re currently in contact with potential users and identify their hard and soft requirements. Based on that we want to create a loose roadmap on GitHub. Do you miss a specific feature? Create an issue!

Do you have feedback? Write @voxpupuliorg, Robert or directly to me on Twitter or respond here with a comment. And most important: Don’t forget to checkout https://voxpupu.li/ ! (The Rails app I wrote about for an hour).

Posted in General, Linux, Puppet | Leave a comment

Dovecot: Apply sieve filter to existing emails

I recently restructured my email setup and updated my sieve filter (server side email filtering). I now have a sieve configuration file that’s way stricter. Many of the emails in my INBOX would now be sorted into subfolders, but Dovecot applies rules only to incoming messages.

Luckily, Dovecot provides a tool to apply existing rules to existing emails!

sieve-filter -v -C -u tim@bastelfreak.de /home/vmail/bastelfreak.de/tim/.dovecot.sieve INBOX

This will simulate the filters in the .dovecot.sieve file to the INBOX folder from the tim@bastelfreak.de. It won’t actually modify emails. If the output looks good, you can add the -W and -e option. With -e, the emails are processed and, if a rule demands it, copied to another folder. With -W, the source folder will be modified as well. This means: If you add -e but not -W, you will end up with the email in two folders.

Posted in General, Linux, Short Tips | 1 Comment

Arch Linux installation guide

A long time ago I wrote a blog post about installing Arch Linux:

I’m aware of the fact that there isn’t one definitive guide for installing it. This highly depends on your hardware, your use case for the system and for the desired software. Nevertheless I thought I update my previous article, because:

  • that’s an easy topic to get back to blogging!
  • I’m lazy and like to have a copy and paste script :P

Assumptions

  • We install a headless server that’s accessible via DHCP/SSH
  • It’s booted via BIOS mode, no UEFI
  • the OS will be stored as /dev/sda

Bootstrap the base system

# clean old partition tables / filesystem information
wipefs --all /dev/sda
# create a fresh GPT partition table
parted /dev/sda --script mklabel gpt
# parted won't format partitions, you've to specify any filesystem
# but the attribute will be ignore
# bios boot partition
parted /dev/sda --script mkpart primary ext3 2048s 4095s
# /boot
parted /dev/sda --script mkpart primary ext3 4096s 1953791s
# rest for LVM
parted /dev/sda --script mkpart primary ext3 1953792s 100%
parted /dev/sda --script set 1 bios_grub on
# setup LVM
pvcreate /dev/sda3
vgcreate vg0 /dev/sda3
lvcreate --size 50G --name root vg0
mkfs.ext4 -v /dev/sda2
mkfs.ext4 -v /dev/mapper/vg0-root
mount /dev/mapper/vg0-root /mnt
mkdir /mnt/boot
mount /dev/sda2 /mnt/boot
# use own mirror with aur repository
echo 'Server = http://mirror.virtapi.org/archlinux/$repo/os/$arch/' > /etc/pacman.d/mirrorlist
# update local repository cache
pacman -Syy
# install base OS
pacstrap /mnt base base-devel vim htop grub openssh linux-hardened linux-hardened-docs linux-hardened-headers linux linux-docs linux-firmware linux-headers linux-lts linux-lts-headers linux-lts-docs lvm2 inetutils man
# generate fstab
genfstab -U /mnt >> /mnt/etc/fstab

chroot into the new system

arch-chroot /mnt
# setup you most favourite hostname
echo myawesomebox.mylocaltld > /etc/hostname
echo LANG=en_US.UTF-8 > /etc/locale.conf
echo "en_US.UTF-8 UTF-8" > /etc/locale.gen
locale-gen
echo LANG=en_US.UTF-8 > /etc/locale.conf
echo KEYMAP=de > /etc/vconsole.conf
# setup a sane list of hooks
sed -i 's/^HOOKS=.*/HOOKS=(base systemd keyboard sd-vconsole autodetect modconf block sd-lvm2 filesystems fsck)/' /etc/mkinitcpio.conf
# you can omit the virtio* modules if this isn't a VM
sed -i 's/^MODULES=.*/MODULES=(ext4 vfat usbhid hid igb virtio_balloon virtio_console virtio_scsi virtio_net virtio_pci virtio_ring virtio ne2k_pci)/' /etc/mkinitcpio.conf
# regenerate initrds with all hooks + modules
mkinitcpio --allpresets
# start basic systemd services after first boot
systemctl enable sshd systemd-networkd systemd-resolved systemd-networkd-wait-online
# install grub + create grub config
grub-install /dev/sda
sed -i 's/quiet/quiet nomodeset/' /etc/default/grub
sed -i 's/.*GRUB_DISABLE_LINUX_UUID.*/GRUB_DISABLE_LINUX_UUID=false/' /etc/default/grub
echo 'GRUB_DISABLE_SUBMENU=y' >> /etc/default/grub
sed -i 's/^GRUB_TIMEOUT=.*/GRUB_TIMEOUT=10/' /etc/default/grub 
grub-mkconfig -o /boot/grub/grub.cfg
# setup ssh login
sed -i 's/#PermitRoot.*/PermitRootLogin prohibit-password/' /etc/ssh/sshd_config
mkdir /root/.ssh
curl https://github.com/bastelfreak.keys --silent > /root/.ssh/authorized_keys
sed -i 's/^/no-port-forwarding,no-X11-forwarding,no-agent-forwarding /g' /root/.ssh/authorized_keys
# change root password
echo 'root:YOURNEWPASSWORD' | chpasswd
# create a networkd config with DHCP
dev=$(ip route show default | awk '/default/ {print $5}')
mac=$(cat "/sys/class/net/${dev}/address")
{
echo '[Match]'
echo "MACAddress=${mac}"
echo ''
echo '[Network]'
echo 'DHCP=yes'
} > /etc/systemd/network/wired.network
# Add AUR repository
{
echo ''
echo '[aur]'
echo 'SigLevel = Optional TrustAll'
echo 'Include = /etc/pacman.d/mirrorlist'
} >>  /etc/pacman.conf
# Done \o/
exit
umount /mnt/boot
umount /mnt
sync
reboot

I hope that this basic setup might be useful for at least a few people. There isn’t anything special about it, but I tried to automate all the interactive parts away. You might like this for your own scripts.

Posted in General, Linux | Tagged , | 2 Comments

Vox Pupuli – Code of the Week 2

This is a new blog series that we would like to introduce. At Vox Pupuli, we receive many Pull Requests. We receive so much awesome code, that isn’t really appreciated. In the past, some of our members sent out tweets if they saw cool code. We now want to start a blog series with regular updates to appreciate the work of our collaborators and contributors.

We continue in week two with an unusual, but awesome, contribution. A long time ago emlun007 created a very fancy logo for our puppetboard project! Sadly, this contribution slipped through:

8bit vox

Another collaborator, Sebastian Rakel, was so kind to separate the image from the background (he kind of patched it – this pun is required to qualify this for the Code of the Week series):

8bit vox

We receive a lot of actual Puppet code as contributions, but there are so many other things that are important as well. Such as updates for documentations or logos. Did you know that we have a dedicated repository for all the logos and images we have?

Thank you emlun007 and Sebastian for this cool contribution!

Did you spot some cool code as well? Write a short blogpost or write an email to our Project Management committee or just drop a note on our IRC channel #voxpupuli on Freenode.

I also published this talk at https://voxpupuli.org/blog/2019/01/07/code-of-the-week/

Posted in General, Linux, Puppet | Tagged , , | Leave a comment

Thunderbird: Hide local hostname in mailheaders

By default, thunderbird uses the local hostname within the SMTP-Submission dialog with the mailserver. There might be situations where you have a hostname that exposes private data, like a company name. Sometimes this is very helpful for debugging, but sometimes you want to hide it. You can configure this in Thunderbird:

Thunderbird Menu -> Preferences -> Prefernces -> Advanced -> General -> Config Editor

In this window, you can create a new config entry named mail.smtpserver.default.hello_argument with the String datatype. As value, you can set any string. Something like `localhost` might even look valid to other mailserver administrators.

The old mailheader:

Received: from normalhostname (unknown [IPv6:*removed*])
	by example.com (Postfix) with ESMTPSA id 9E4302FE07
	for <user@example.com; Sat,  5 Jan 2019 01:50:25 +0100 (CET)

The new headerentry:

Received: from localhost (unknown [IPv6:*removed*)
	by example.com (Postfix) with ESMTPSA id C5151300C5
	for <user@example.com; Sat,  5 Jan 2019 01:41:39 +0100 (CET)
Posted in General, Linux, Short Tips | Tagged | Leave a comment

Vox Pupuli – Code of the Week 1

This is a new blog series that we would like to introduce. At Vox Pupuli, we receive many Pull Requests. We receive so much awesome code, that isn’t really appreciated. In the past, some of our members sent out tweets if they saw cool code. We now want to start a blog series with regular updates to appreciate the work of our collaborators and contributors.

We start the calender week 1 with a contribution from Paul Hoisington. He created a pull request for our yum module.

A breakdown of his code:

$_pc_cmd = [
  '/usr/bin/package-cleanup',
  '--oldkernels',
  "--count=${_real_installonly_limit}",
  '-y',
  $keep_kernel_devel ? {
    true    => '--keepdevel',
    default => undef,
  },
].filter |$val| { $val =~ NotUndef }

We’ve an array of values and a selector statement (which deserves a dedicated post). We don’t know which value the selector will return, Undef is possible, but not desired. We need to filter anything from the array that is Undef. For newcomers: Undef is very similar to Nil in Ruby. So Paul applies the filter method to the array. It will apply a lambda to each value in the array. If it returns true, the value will be returned in a new array with all other values that also evaluated to true.

Now the cool part: NotUndef! Paul uses =~ to match the values against the NotUndef datatype. In most languages, =~ is used to validate against a regular expression. In Puppet, you can also evaluate against a datatype like StringArray or Undef (or many more). The NotUndef type is a meta type which basically applies to all types, exept for Undef. This type is rarely used and not well known, but still super helpful!

Thank you Paul for this cool contribution!

Did you spot some cool code as well? Write a short blogpost or write an email to our Project Management committee or just drop a note on our IRC channel #voxpupuli on Freenode.

I also published this talk at https://voxpupuli.org/blog/2019/01/01/code-of-the-week/

Posted in General, Linux, Puppet | Tagged , , | Leave a comment